

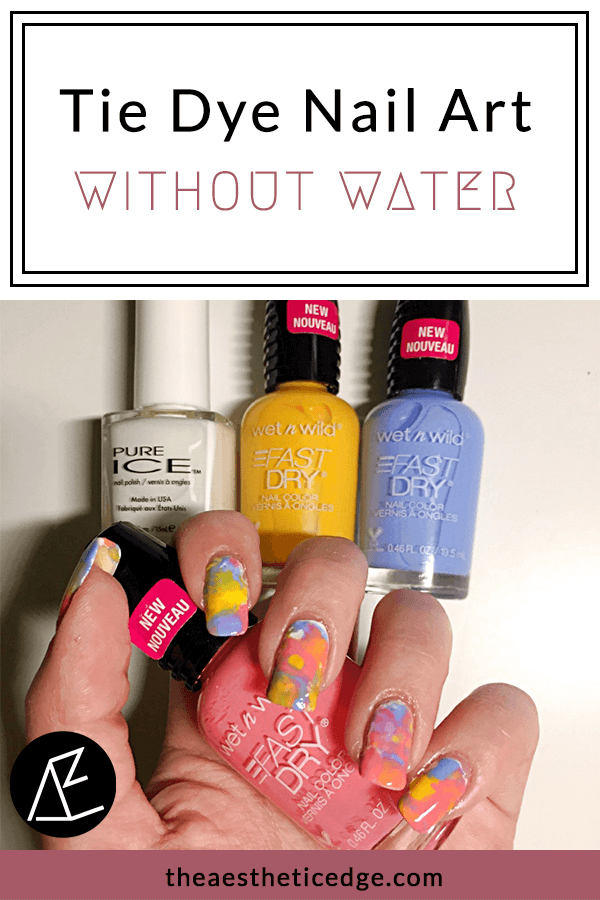
For the 4th of July I posted a tie dye nail look to my Instagram Stories and I took a vote asking if you all would like to see a tutorial. The answer is a unanimous yes, and so this tie dye nail art without water tutorial is finally here! One night I was scrolling through my Instagram feed and saw one of those quick videos showing tie dye nail art. You know, those kinds of videos that make you wonder if what you are seeing really works. So, I am giving it a try, and I am pleased with the results! Many tie dye tutorials require you to use water and plenty of nail polish and other supplies. This process saves you time and wastes less nail polish with streamlined materials. Let’s get started.
Before You Get Ready to Tie Dye
Before doing any type of manicure, you need to get your nails prepared. I already have a blog post on my nail care routine, and it is absolutely a companion to this post that you should have open in another tab. It outlines everything you need to know to file/shape, to cleanse, top coat and base coat recommendations, how to paint your nails, and more. It even discusses the after care. It is the nail bible, as far as I’m concerned. This tutorial jumps right in with nails that are painted and ready to go.
Related Post: Nail Care Routine & Basic Manicure How-To
Tie Dye Nail Art Without Water Tutorial
Supplies
First things first, we need to talk about supplies to successfully carry out this tie dye nail art without water manicure.
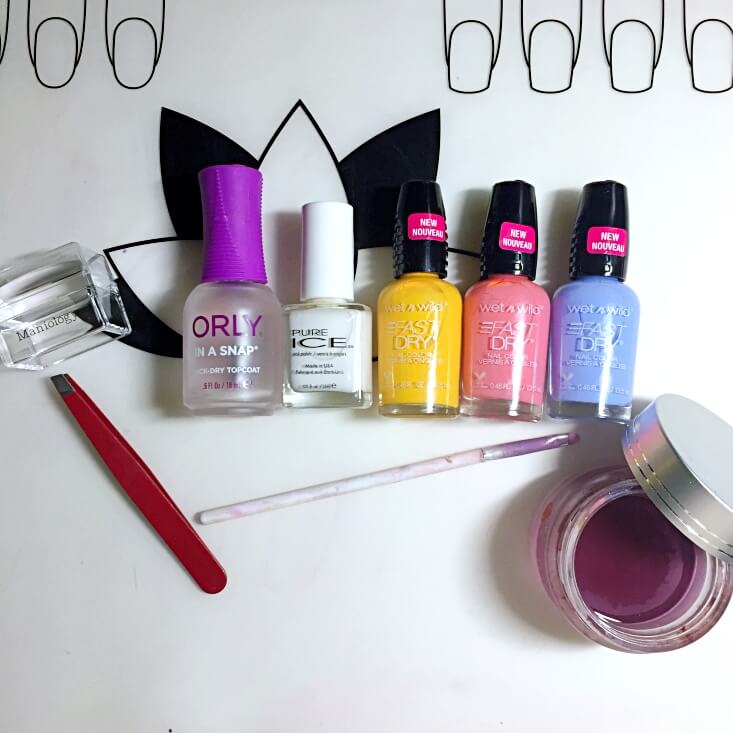
- Base coat: The only type of base coat that I will use is something that dries quickly, is super shiny, and has the ability to perfect imperfections in my nail polish by smoothing everything out. My go-to is Orly’s In a Snap Top Coat.
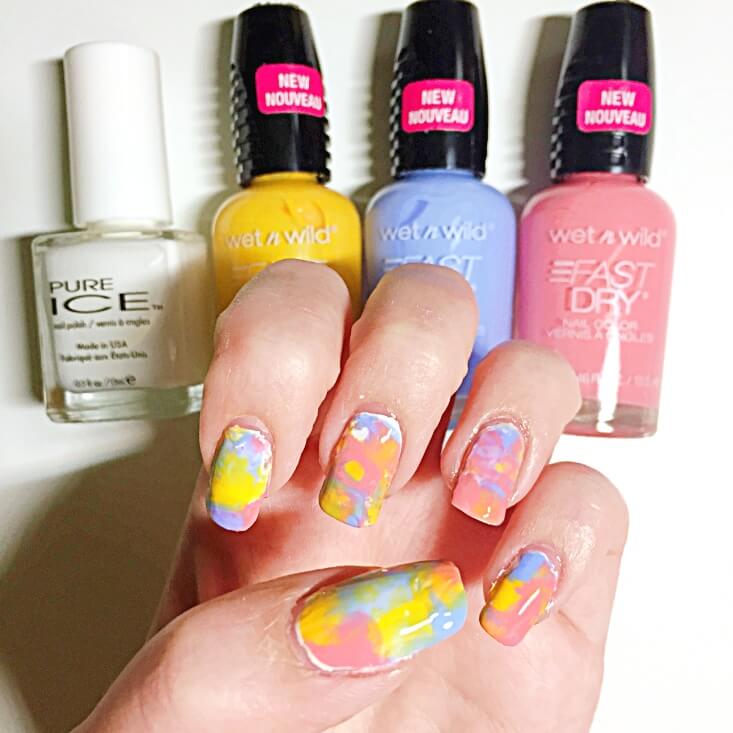
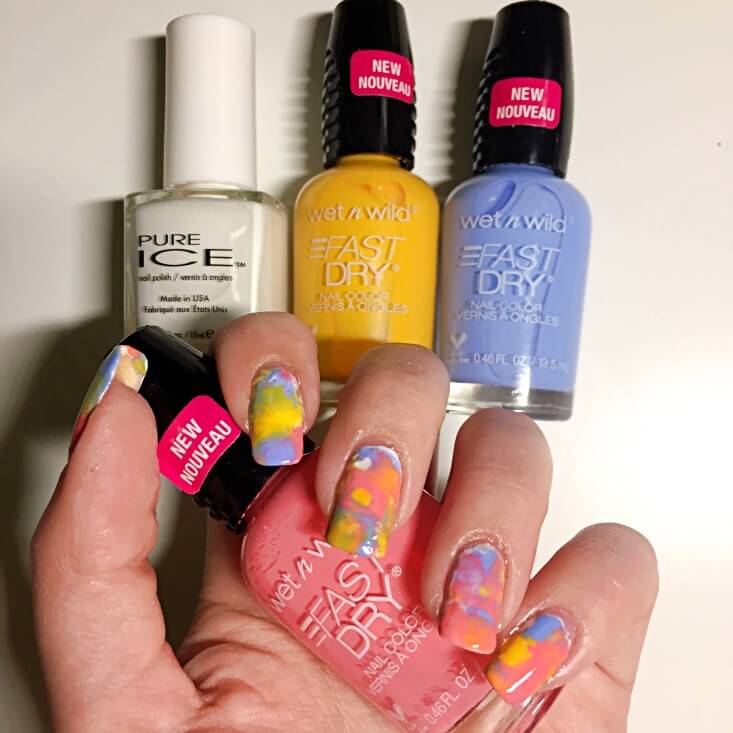
- Nail polishes: You can use as many nail polish colors, and whatever colors that you like. For this post I want to stick to nail polishes that you can still purchase, so I am using wet n wild’s Fast Dry Nail Color in the shades Designated Driver, Mile High Club, and Let’s Flamingle.
- Base color: This technique works the best over top of plain white nails to help the colors pop. Using a dark nail color will muddy up the results. You can literally use any white that you want, but again I want to provide an option that you can still purchase. I am using Pure Ice in Super Star.
- Tweezers
- Cleanup brush
- Acetone (and having it in a jar is helpful)
- Nail stamper: To make the tie dye effect you will need a nail polish stamper. Nothing fancy is required here. I am using a basic stamper from Maniology which is called the Ice Cube Clear Rectangular Stamper. While the price is cheap it is a great stamper and a good investment to make because you can use it for stamping, to make decals, etc. in the future.
- Nail mat: We are creating the tie dye decals on a nail mat. This needs to be a mat that can stand up to acetone, nail polish, and one that the nail polish can peel off of. I have been using Maniology’s Lotus Mat for years, and I fully recommend it.
The Aesthetic Edge is a Maniology ambassador, so do not forget to use our 10% off discount code “TAE10” at checkout!

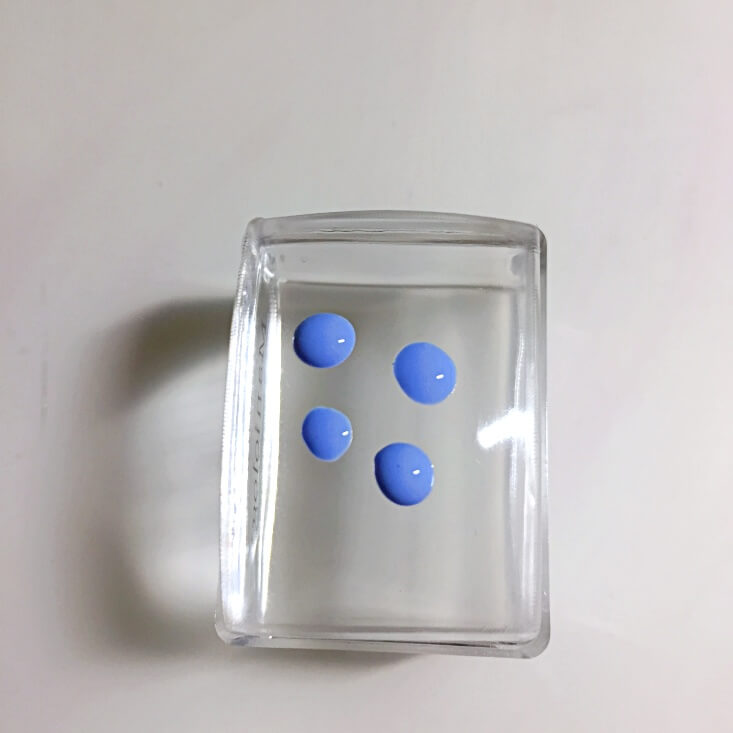
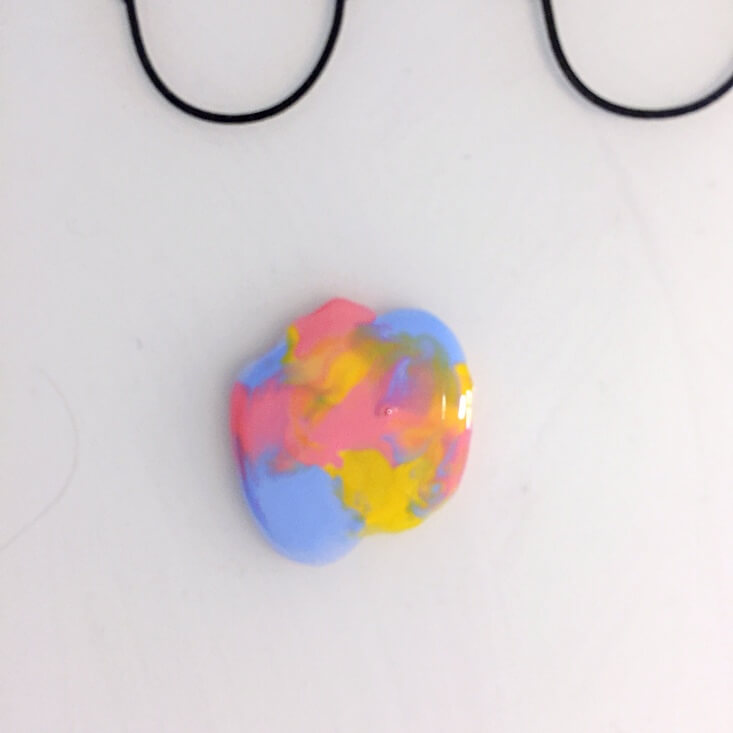
Step 1) Apply nail polish drops to stamper
The first step in this tie dye nail art without water tutorial is to drip nail polish onto the stamper. There really is no rhyme or reason to this. You can use as many or as few colors of nail polish that you want, and you can drip as much as you want.
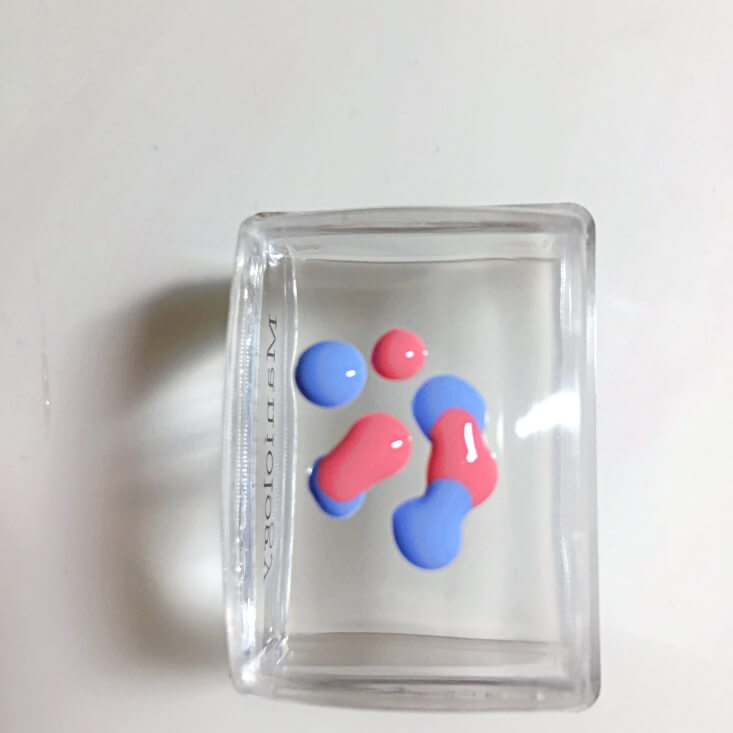
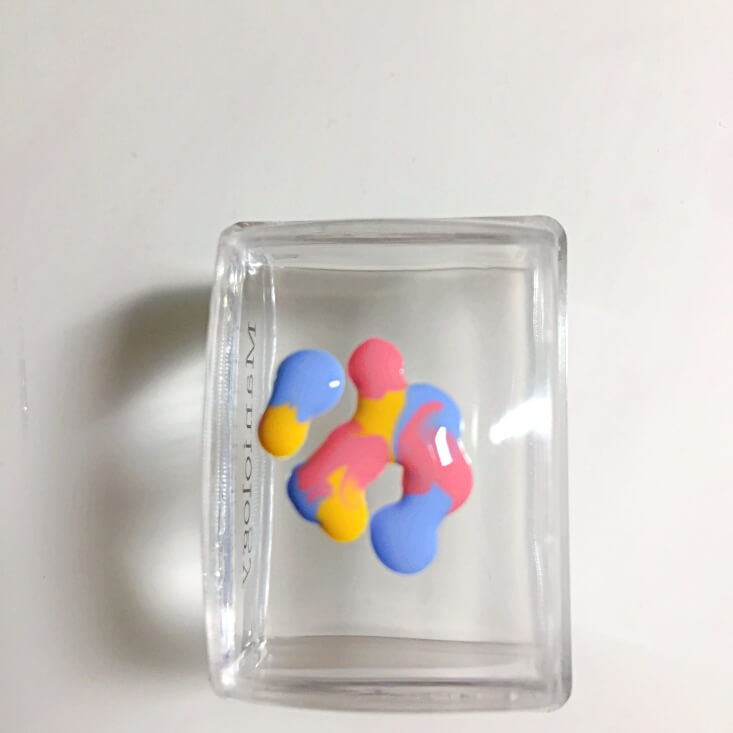
Step 2) Press stamper onto mat
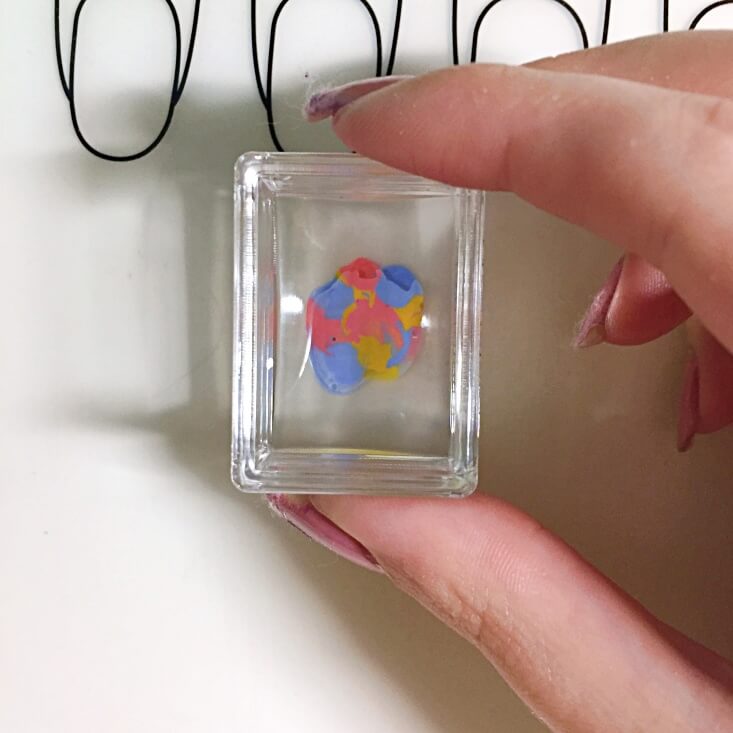
Now that you have as much nail polish dripped onto your stamper as you want, it is time to make your decal. Gently press the stamp onto the Lotus Mat and apply a slight circular motion. The motion will start to blend the colors together and give you that tie dye effect.
Also, always do this on a clean mat. I clean mine with acetone beforehand.
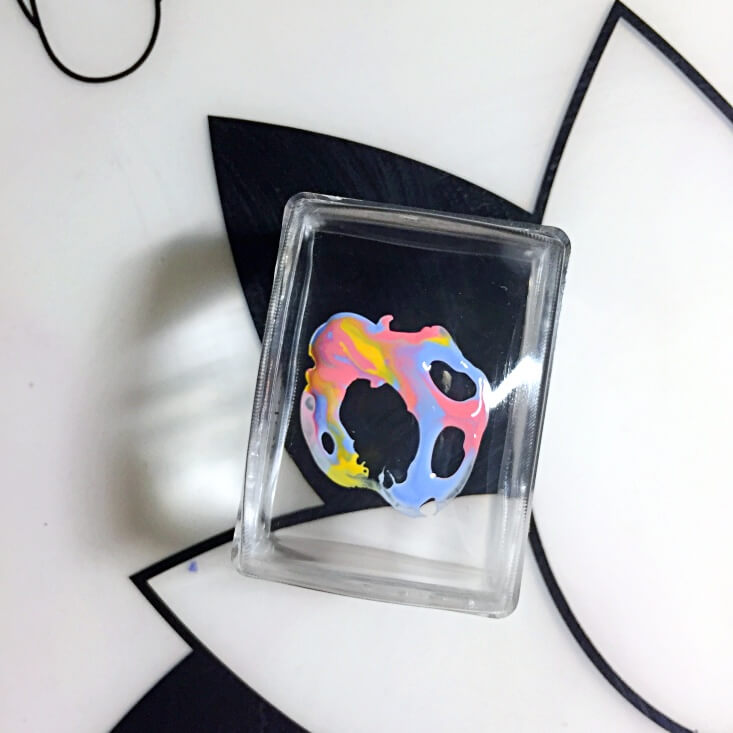
Step 3) Clean the stamper
There will be some nail polish residue on your stamper. I do nothing fancy to clean it up. I simply stamp the stamper a few times onto the mat until the residue is removed. You should not use acetone on your stamper. If the nail polish is really stuck I recommend using tape to remove it.
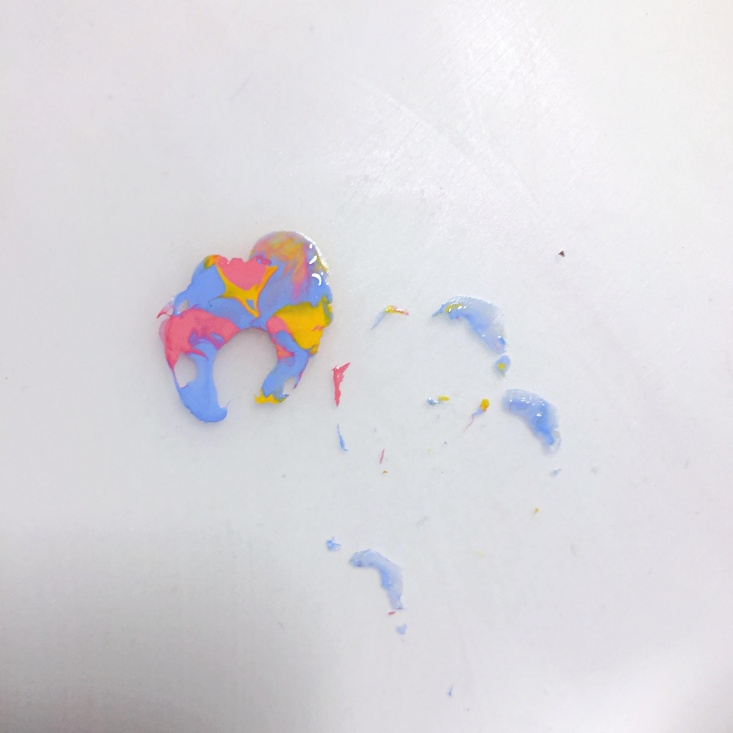
You will want to repeat steps one through three until you have 10 decals drying on your mat. While they are drying I prep and work on my nails to get them ready to apply the decals. By the time you are ready to apply your decals, they will be fully dry. They really do not take that long in general, but you might as well work while they are drying.

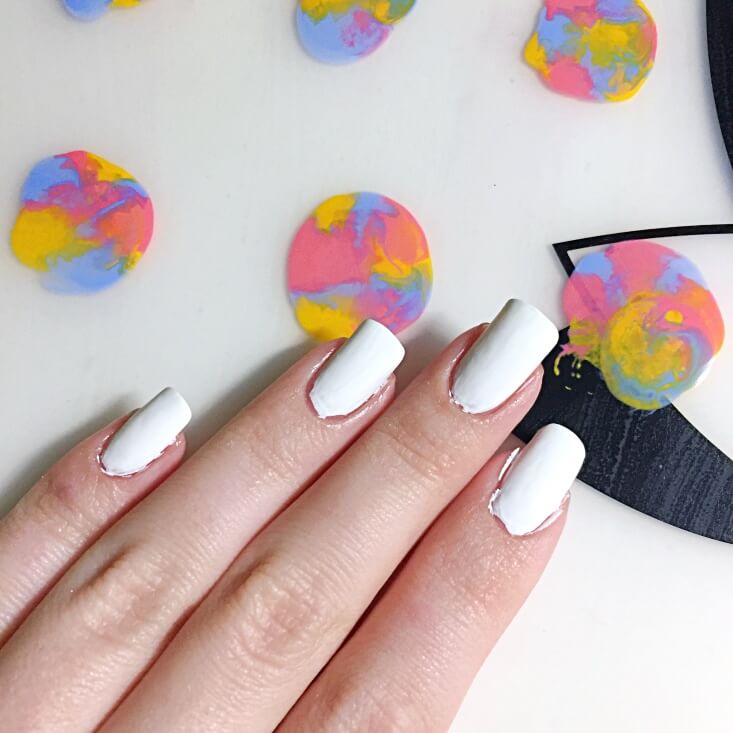
Step 4) Begin your manicure and paint nails
At this point all of your nails should be painted with base coat and two coats of white nail polish, and they should be dry. If you made a mess with your white nail polish like me, do not worry about it. We are about to get a lot more messy before we get cleaned up.
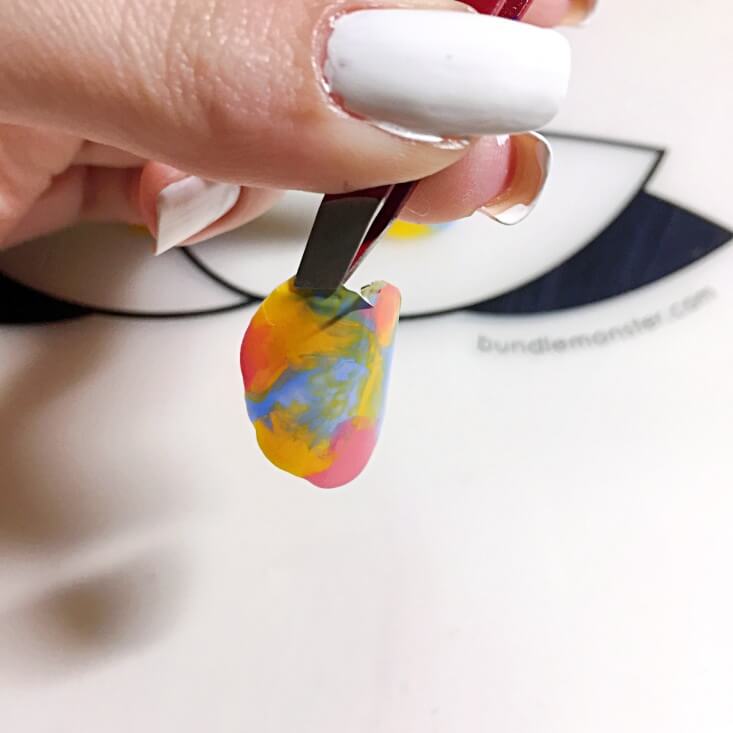
Step 5) Apply a decal
Now for the part of the tie dye nail art without water tutorial that you are waiting for- applying the decals! You need to work one nail at a time. Begin by painting a layer of top coat onto one nail. The top coat allows the decal to stick to the nail, so you cannot skip this step. Using the tweezers, gently peel a decal off of the mat and lay it onto your nail.
Every now and then one of the decals does not peel off very well and basically gets ripped to shreds. I go ahead and make a new one and let it dry as I work on other nails.
Related Post: Dip Powder Nails Tutorial
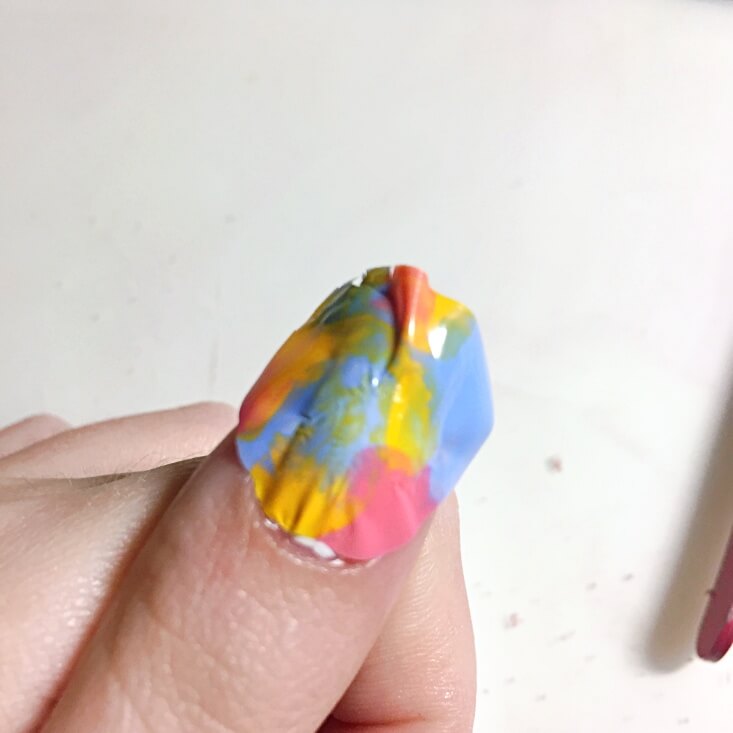
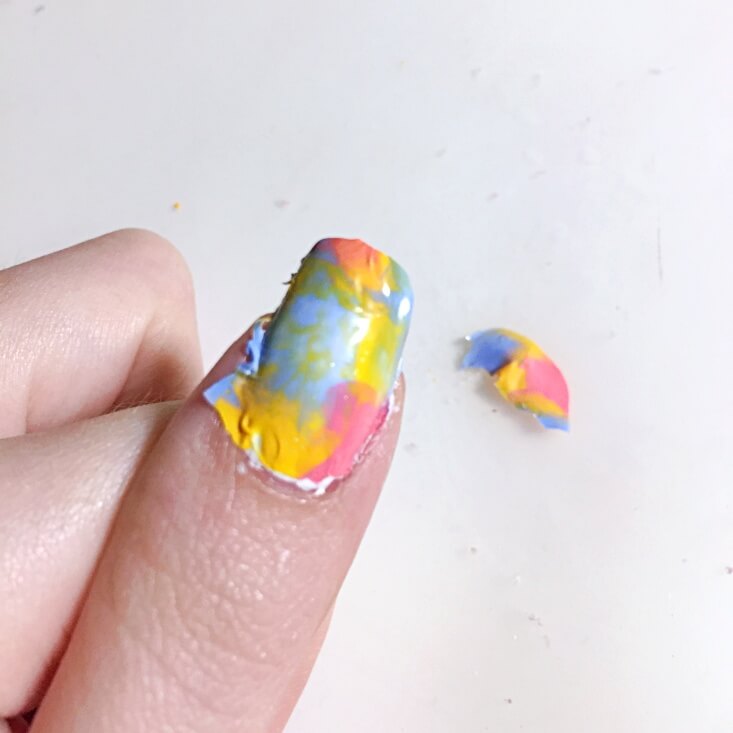
Step 6) Smooth decal and remove excess
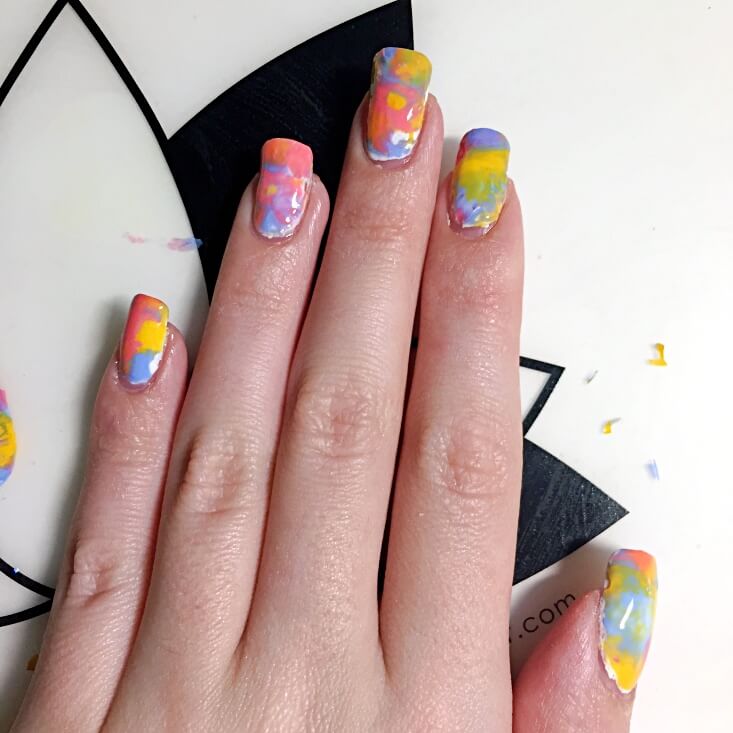
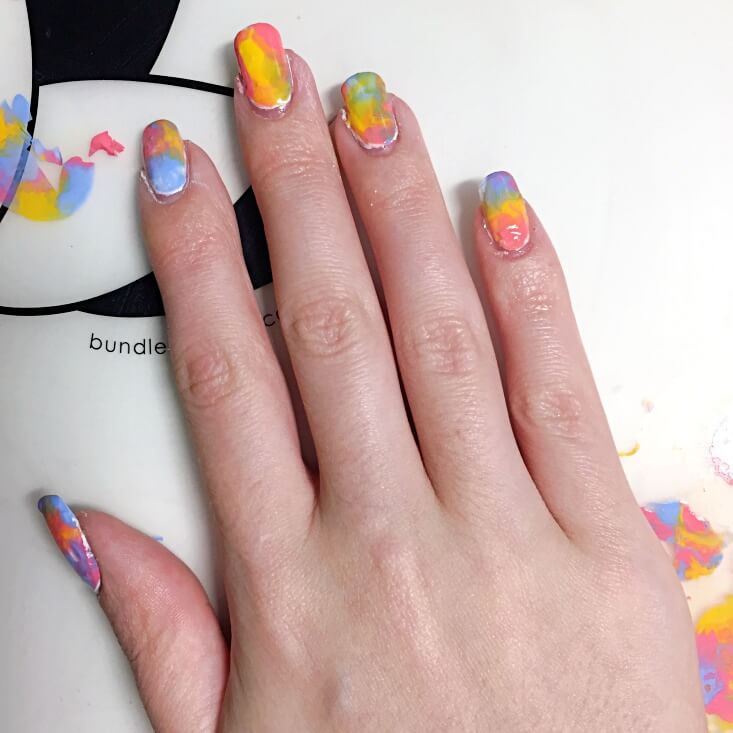
Once the decal is on the nail I use my finger and smooth it out. The top coat reactivates the decal quickly, so you will not be able to touch it very much before it gets mushy and melty. There will be creases, bumps, and other imperfections, but they will be fixed later. You can use the tweezers to gently tear/cut away the excess. For the excess overhanging the nail tip, you can fold it over and then tear it away, or even use a nail file to file it off. At this point your nail is going to look like a complete hot mess, but again I assure you we will clean this up! Repeat steps five through six until you have decals on all of your nails.

Step 7) Clean up the skin and cuticles
Now that your decals are applied to all of your nails, you will take part in the satisfying portion of this tie dye nail art without water tutorial- the clean up. Using your nail clean up brush and acetone, go ahead and remove any nail polish that is on your skin. I always remove the polish from my cuticles in sort of a c-shape, which I talk about more in my nail care routine. Regular nail polish remover is not strong enough for this step and you will spend ages cleaning up. See, our nails are looking better already, except for those creases/bumps/bubbles with the decals themselves.
If during this process you accidentally damaged a decal and have a white spot showing, you can gently touch that spot up with a corresponding nail polish color. When we apply top coat soon it will blend it into the decal, hiding your error.
Related Post: How to Style Tie Dye
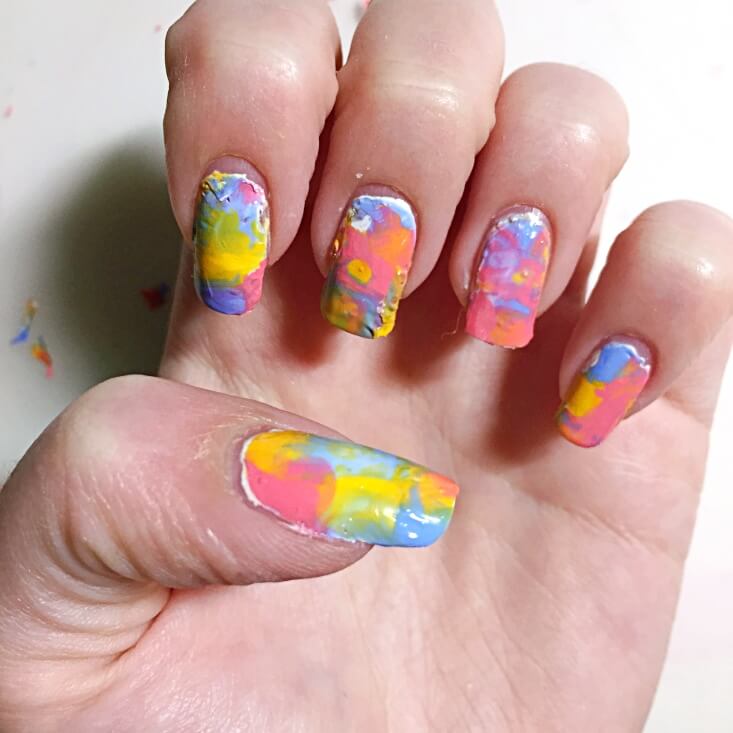
Step 8) Apply top coat
For step eight we are going to apply top coat to the nails. I always do two layers. You will see immediate results after just one coat. All of your bubbles/bumps/creases are now gone, and the colors look blended.
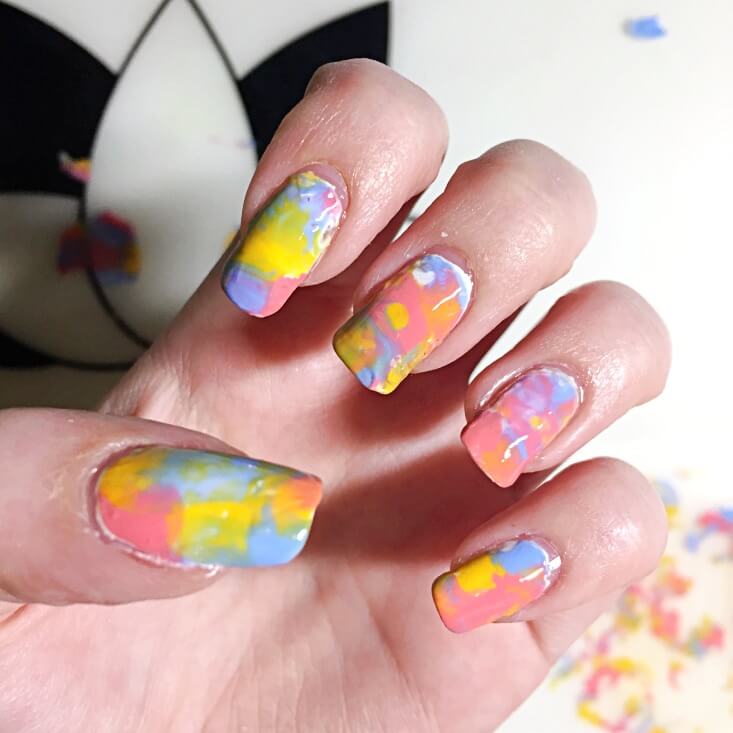
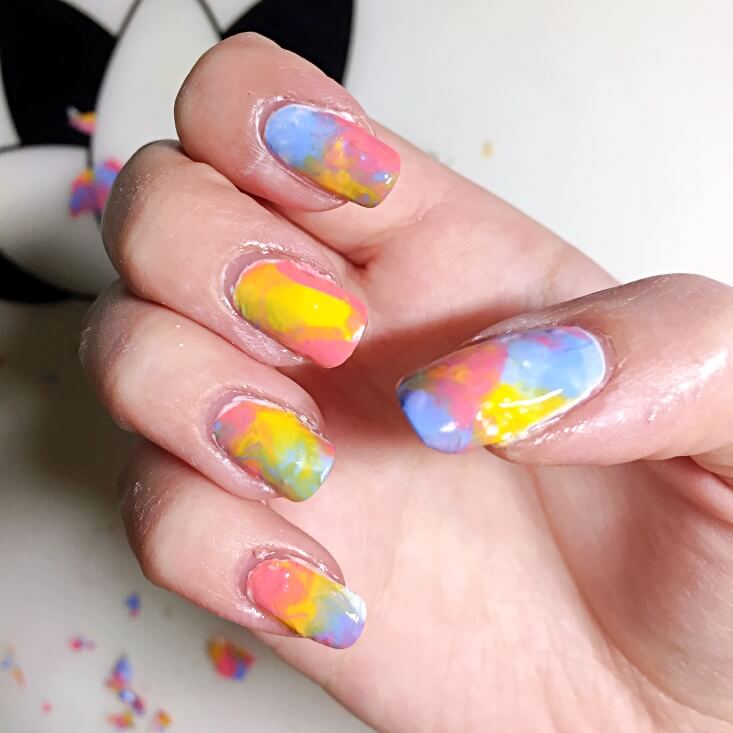
Enjoy your fresh manicure!
We are at the end of this tie dye nail art without water tutorial, so sit back and admire all of your work! This manicure removes easily with nail polish remover just like any other manicure. Be sure to go back and reference my nail care routine post for aftercare, like applying cuticle oil and hand lotion.
Shop the post
Another reminder- The Aesthetic Edge is a Maniology ambassador, so do not forget to use our 10% off discount code “TAE10” at checkout!
Conclusion
In summary of this tie dye nail art without water tutorial, anyone can accomplish this look with no skills required. You can see first hand how messy my nail work is, but it still comes out decent. The supplies list is not that long or expensive. I wager that you have many of these items already, but you may need to purchase a stamper and a mat. I have heard of people using plastic wrap in place of a mat, but I have not tried that to fully back it. The techniques used in this tutorial can also be used to create your own nail polish wraps and decals. Be sure to share your manicures with me on social media with #theaestheticedge! Until next time, continue to let your true beauty shine.
Would you wear tie dye on your nails?